
Creating a Product
If you’ve ever used a wordpress blog, making a product is exactly the same as writing a blog post – as our system (Woocommerce) is a plugin for WordPress. If you’re not familiar with a wordpress blog, this guide will show you how to add a product.
The product page has a “Visual” and “Text” mode for entering the description (shown in the red circles) – the “Visual” editor lets you easily customise the look of your description (changing font colours etc.). The “Text” mode is needed for pasting in any code (such as Paypal buttons).
Click to enlarge
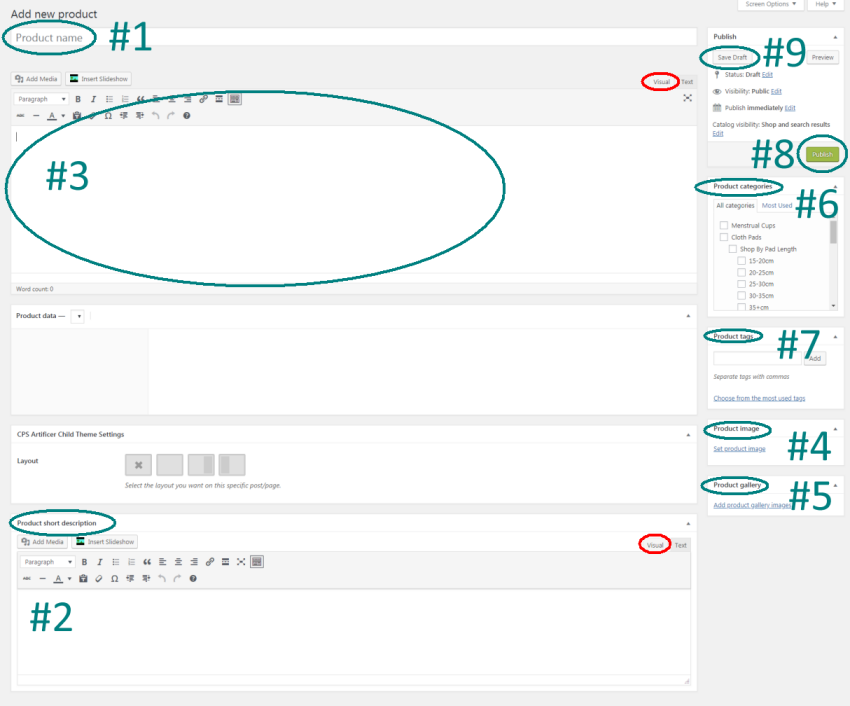
Section #1 – Product Name – this is the title for your product, and what will show in the shop pages. We have the titles set to “truncate” (cut off) after 25 characters (including spaces) to avoid titles becoming 2 lines in the shop/category views, as this throws the page alignment out. This means you can make titles longer than this, but you might find a word gets chopped off partway through and looks funny. So it is recommended to try and keep titles under 25 characters. Additionally, if you use more than about 2 capitals in the title, the title may still go to 2 lines because capitals are wider than lowercase letters. So please check how the product title looks in the shop view to try and avoid your titles looking weirdly chopped up or going to 2 lines.
Section #2 – “Short Description” – This is a text area that shows at the top of the page (see example page below). You don’t have to put any description here if you don’t want to. It is recommended not to put a lot of information here, as the long description area is better for that. However a brief (1-2 line) description is enough to give customers the basic info, with more details below.
This is the section you should put your paypal button or other method for getting the customer order – as this is where the “add to cart” button normally is in the store, so it is where customers would expect there to be something to click to buy it.
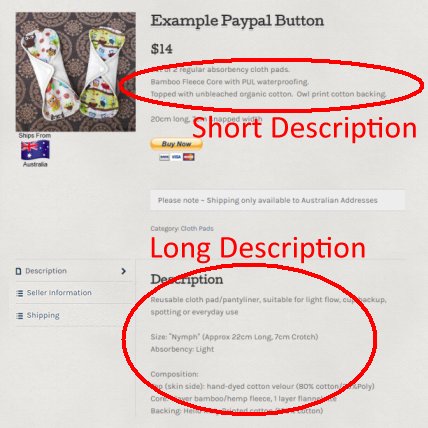 Section #3 – “Long Description” – This is the main content area of the product listing shown lower on the page. This area displays with more room, so is the perfect place to put all the information on the product, such as materials used, measurements and other information.
If you don’t have anything in this space then the page won’t generate the “Seller info” and “shipping” tab sections – so it is advisable to use this section for the main content of your product description.
Section #4 – “Product Image” – This is the main product photo that is shown in the product pages. This image needs to be square (doesn’t have to be exact, but needs to look visually square) to fit our page layout properly.
Section #5 – “Product Gallery” – This is where you can put any additional images. It is recommended to include an image of your national flag, to help show customers where you are located, you can put as many additional images as you like on a purchasable product here. If your listing is for a “Stocking” or “Example” listing then you are not permitted to use additional images (although you may still use the flag image to show your location)
Section #6 – “Product Categories” – This is where you select which category or categories your product fits into. Only purchasable items can be put into the general categories, as this is reserved for our shop items that people can buy the product as shown. “Example” products must only be placed in the “Example” category and “Stocking” products must only be placed in the “Stocking Announcement” category.
Section #7 – “Product Tags” – (optional) This is where you can select the tags for your product (Purchasable products only – “Example” and “Stocking” listings are not permitted to use tags). You must only select tags that have already been created, you must not create new tags.
Information on Tags
We are using the “tag” system as a way customers can search the taglist for fabric prints/colours/themes. This is shown in a menu under the store categories.
We have many users on CPS and if everyone made their own tags we’d end up with a MASSIVE list of tags with MANY duplicates and MANY MANY spelling mistakes. flower, flowers, flowrs – for example are 3 tags we’ve had, complete with typo.
You MUST only use tags that are already in the system and not create new ones. Unfortunately there is no way for our system to prevent you adding new tags, you have to take responsibility for yourself and not add them.
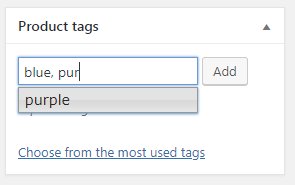
 To use tags, start typing the first 3 letters of the word.
Existing tags matching those 2 letters will appear in a list.
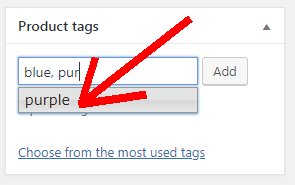
If a tag already exists for the word you’re after, then click that word and it will be added to the line finishing off the word you started typing. If no tags come up, then there is no tag for that word and you cannot use it!
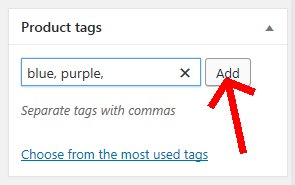
 Once you have selected tags from these already created tags, then click “Add”.
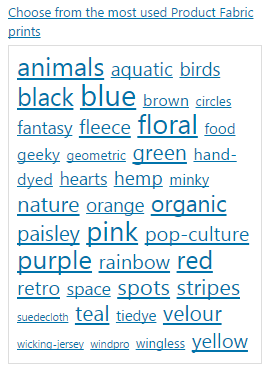
If you’re not sure how to select a tag without making a new one, then I suggest instead clicking the “Choose from the most used tags” option, and choosing from the list of already created tags instead.
Clicking each word will add that tag to your list.
Section #8 – “Publish” – Once you have put your title in, description, photos, and categories – it’s time to publish. Click this button to add the product to the site.
Section # 9 – Advanced Options – (Click here for more information on these options) In this section you can change the date the product was published, save it as a “draft” instead of publishing it, or make the product “hidden”. This is where you can schedule a product to go live at a certain time.