Scheduling, Hidden Products & Changing Sort Order
This page covers
- Scheduling a product to appear on the site at a certain time – eg allowing you to create products in advance but make them all “go live” (appear) on the site at a specific time
- “hidden” products – for example creating a custom listing for a particular customer, a “layby” product for a specific customer or any other time you want to make a product but only have it visible to people you send the link to.
- Sort Order – changing the sort order of your products – eg to move something further back or forward in your store.
Scheduling a product
If you would like to upload your products and have them all go “live” at the one time (for example you have declared a stocking date but you’d like to start adding products a few days before then) you can add your products and set the date that they are scheduled to be published on.
Two VERY IMPORTANT things to remember with scheduling are:
- If nobody is using the CPS site at the time your scheduled stocking happens, the listings won’t activate! This is a known bug with wordpress, so there is nothing we can do to fix it. If you make the stocking for a time people are likely to be using the site, or if you yourself are on the site at the time – then it should go through fine. So it is advisable to be online when your scheduled time happens. If your products don’t activate when they should, you can use the bulk edit to manually set them to published.
- The scheduled date/time uses the WEBSITE TIME, not your local time. The website time is set to AEST (UTC+10) – and DOES NOT change for daylight savings time.
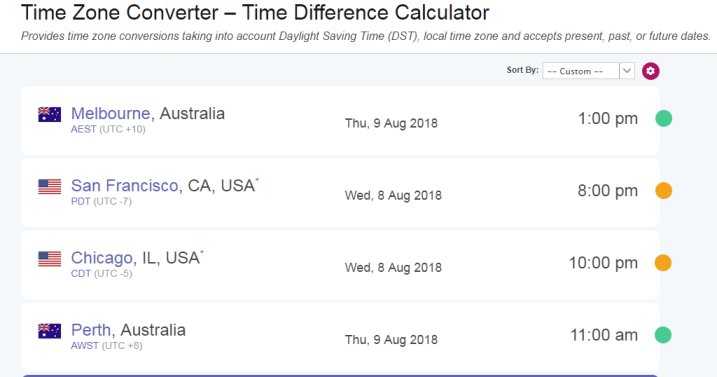
Current CPS website/server time is UTC +10 (Melbourne, Australia time).
The website/server time does not change time for daylight savings time!! But this clock counter does show daylight savings time (I was unable to find a clock that doesn’t change for daylight savings) – so this time clock is going to be 1 hour ahead of the website/server time during the period of daylight savings (7th Oct 2018 – 7th April 2019)
Use this time calculator to work out what the time is in your area. You can add your location to the list, then change the time in YOUR timezone (click the time to edit it) to the time you’d like to set your stocking for (eg 7pm Friday 13th), and that will tell you what time in MELBOURNE you will need to set the products to schedule for.
For example if you were in San Francisco and you wanted to schedule the stocking for 8pm 8th August your time, change the time (and date) on the converter for San Francisco to 8pm – which tells you that you need to set your products to schedule at 1:00pm 9th August Melbourne time (website time)
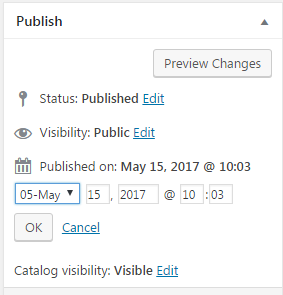
To schedule the product, just set the date (and time) to whatever date you’d like them to display on, and the “publish” button will turn into a “schedule” button. You’ll then see the status will change to “Scheduled” instead of “published” like it would normally say.

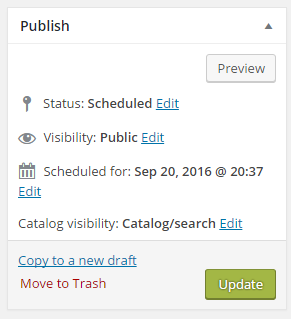
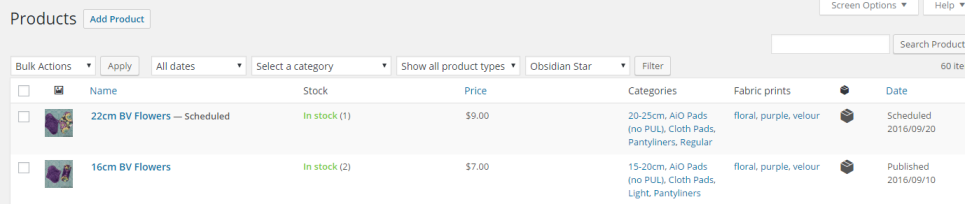
In your product screen the products will show up as being Scheduled for the date you have chosen. They won’t appear on the site until that date/time.
Sort Order
By default the site is set to show the newest products first. This is based on the time you added the product. This can be changed to make your products show up in a different order in your store. For example you might like to make some products appear further back in your store, even if they were recently added. Or you might want to display your products in size order rather than the order in which you added them.
 When you add new products, if you’d like to set it up so that your new products are displayed in a particular order (eg by size) size – what you can do is set the products to a different time – to list them in a specific order.
For example, if I’m listing 6″ pads, 8″ pads and 10″ pads and want the 6″ pads listed first. I could set the time for the 10″ pads as being 10:00, the 8″ pads as being 10:02 and the 6″ pads as being 10:03.
This means that the pads given the 10am time are older, so will be shown lower on the page, and the pads given the time of 10:03 are newer and will show on the page first.
You can either do this as you are adding products – by scheduling them. Or you can go in and edit the products after you have added them to change the times to sort them.
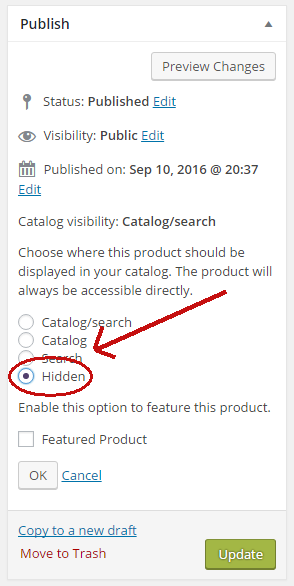
Hidden Products
If you would like to create a product listing that is hidden from all the customers, but that can be emailed to a particular customer – you can set the product to hidden.
This needs to be done in the “backend” editor.
Up in the “Publish” area, change the catalog visibility to “hidden” – this will mean the product is published, but does not show up on the site at all.
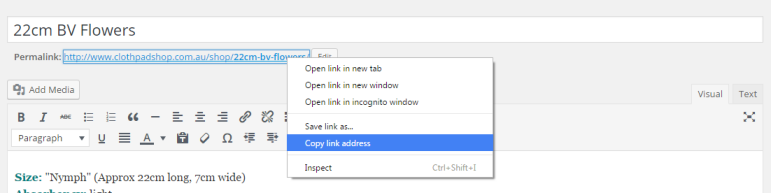
You can then copy the “permalink” (which is the web address for the product), and send this to your customer that will allow them to see the product and purchase it.